
 French
  English
  Italian
  German
  Spanish
  Arabic
 A laptop backpack can look well organized in a drawing and become awkward once the laptop, charger, bottle, and everyday essentials are inside. The sleeve may be too tight, a front organizer may take space from the main compartment, or the device may sit directly against the bag’s base.
For an OEM laptop backpack, settle the carrying load and device fit before adding features. A useful custom laptop backpack design brief specifies usable dimensions, pocket depth, padding construction, strap geometry, and access when the bag is full. These are details the manufacturer can build to and your team can check in a sample.
How Do You Choose the Right Backpack Size and Laptop Fit?
Start with the device’s external dimensions
Screen size is a starting point for a product description, but it does not define the laptop’s width, depth, or thickness. Two devices marketed with the same screen size may have different bodies, and a protective case adds another variable.
List the largest device your product must accept, including any case the customer is expected to use. Give the manufacturer those external dimensions and identify how the laptop enters the sleeve. A narrow zipper opening or bulky seam can restrict access even when the compartment itself appears large enough.
Specify the sleeve’s usable internal dimensions after lining and padding are installed. Ask for proposed manufacturing tolerances and test the tightest acceptable size during sampling. The laptop should slide in and out without catching, while remaining sufficiently controlled inside the sleeve.
Size the bag around the complete daily load
Prepare a packing list before choosing the outer dimensions. A commuter carrying a laptop, charger, notebook, and bottle needs a different layout from someone also carrying headphones, lunch, and a change of clothes.
Load those items together in the prototype and close every zipper. Check whether the bag becomes unusually deep, whether the laptop pushes toward the wearer’s back, and whether the top opening remains easy to use. A stated capacity in liters is useful only when the usable space works with the intended contents.
For a travel-focused design, compare the finished bag with the specific airlines and fare types your customers use. Avoid a universal “airline approved” promise, since baggage allowances vary. HeteBag’s Sac à dos personnalisé page provides a starting point for discussing the intended style and carrying requirements.
How Should You Organize the Compartments and Pockets?
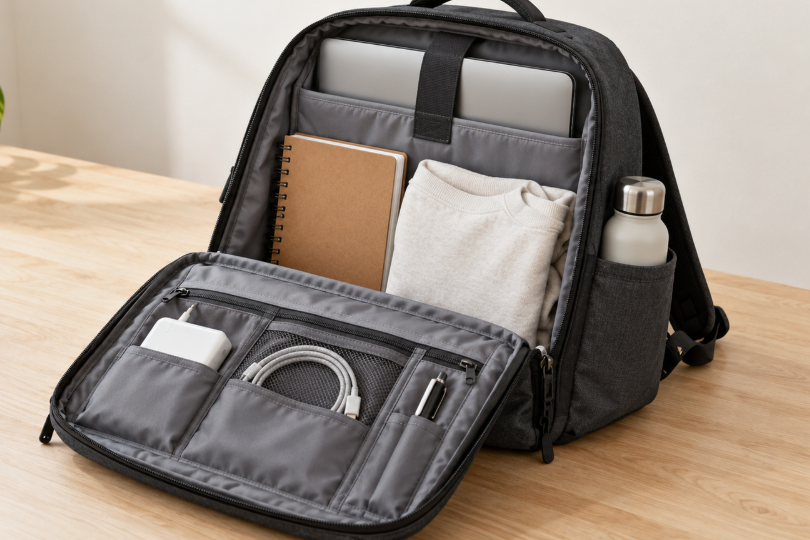
Divide the contents by access frequency, size, and whether they should stay separate. The laptop needs a stable location; keys and a phone need quick access; a charger needs enough depth for its actual shape.
A rear laptop area can allow independent device access without opening the main compartment. An internal sleeve can support a simpler layout, but access may become inconvenient when the bag is tightly packed. Choose the arrangement by testing the user’s routine rather than counting the number of pockets.
| Storage area | Design decision | Sample check |
|---|---|---|
| Laptop sleeve | Usable dimensions, retention, and opening width | Insert the target device with the bag fully packed |
| Charger pocket | Depth and clearance for the intended adapter | Close it without pressing the charger into the laptop |
| Compartiment principal | Space for the agreed packing list | Check access after all organizer pockets are filled |
| Bottle pocket | Bottle diameter, depth, and retention | Use the target bottle and check intrusion into the interior |
| Quick-access pocket | Position and closure | Reach the contents without disturbing the main load |
Pocket volume is shared with the surrounding bag. A flat organizer sewn against the front wall can press into the main compartment when filled, while an external bottle pocket can distort the side panel. Check the laptop backpack compartments together in a loaded sample; inspecting each empty pocket separately will miss these conflicts.
Keep bulky accessories away from the device’s surface and corners. If the design includes a tablet or second device sleeve, provide separation and enough room for both devices. A contrasting lining can also make small items easier to find, provided the color and surface perform satisfactorily in your material checks.
What Padding Does the Laptop Compartment Need?
Specify the construction, not just the thickness
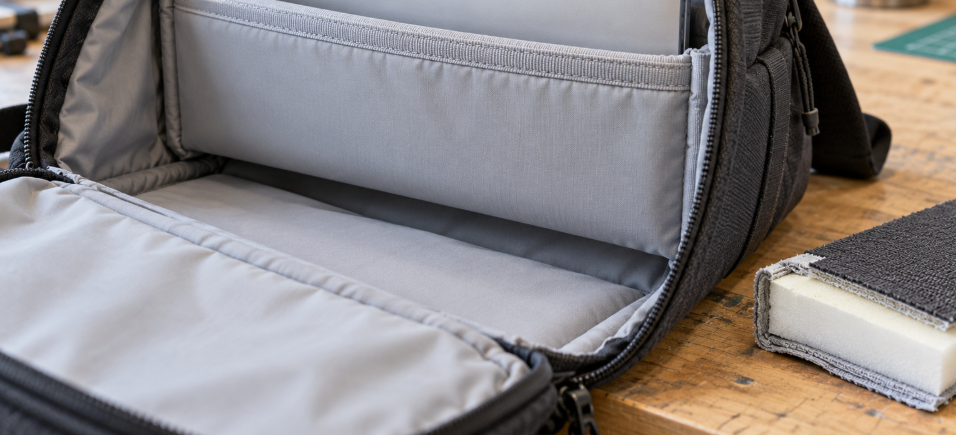
“Padded laptop sleeve” leaves too much open to interpretation. State which surfaces need padding, what foam is proposed, its thickness and density, and how it is held in place. Review those specifications with the supplier against the intended load and protection target.
Foam softness alone does not establish impact performance. A soft layer may feel substantial when squeezed but compress considerably under load, while firmer padding may change the bag’s weight and flexibility. Approve the construction through defined sample checks rather than choosing an arbitrary thickness for every design.
Check the base, sides, and contact points
A raised or suspended sleeve holds the device above the bag’s outer base. That clearance can reduce direct contact during a hard set-down, but it needs to remain present when the device and the rest of the bag are loaded. Record the sleeve’s position and inspect whether its supporting seams allow it to sag.
Look beyond the two large padded faces. Check the bottom corners, side edges, binding, and zipper area for hard contact points. The lining should cover internal hardware and seam allowances that could rub against the device.
Define any impact evaluation with the manufacturer or test laboratory, including the payload, bag orientation, drop conditions, repetitions, and acceptance criteria. Use a suitable test dummy or sacrificial device. A suspended sleeve is a design feature; it does not by itself establish a “drop-proof” claim.
How Can Shoulder Straps and Back Panels Improve Comfort?
Comfort depends on how the loaded bag sits on the body. Thick padding can still feel uncomfortable if the straps attach too far apart, the bag hangs low, or a rigid laptop corner presses through the back panel.
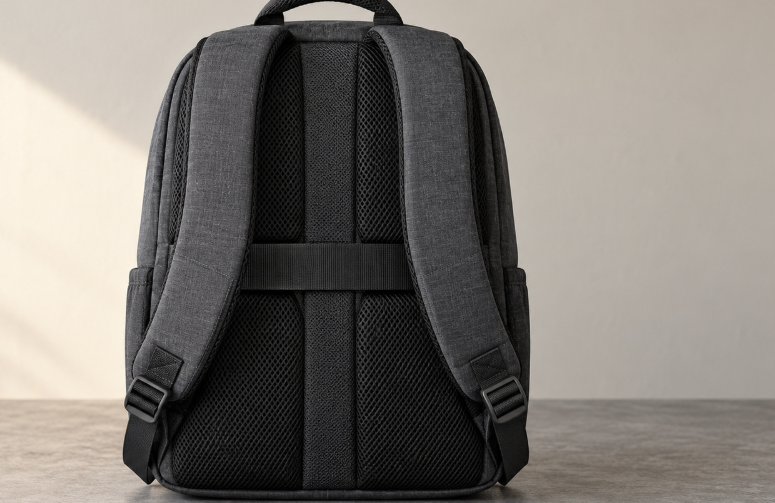
Review strap width, curvature, attachment position, foam, and adjustment range together. Ask several people representing your intended users to carry the loaded sample, adjust the straps, and reach for the pull ends. Check whether the straps stay in place and whether the webbing slips through the adjusters during use.
Keep dense items close to the back where the layout allows, and avoid placing hard accessories directly behind contact areas. Inspect the panel for pressure points with the actual laptop installed. A mesh cover or shaped channels may help the back panel’s feel and airflow, but assess them in wear trials before making strong comfort claims.
A sternum strap can help stabilize the shoulder straps for some users. If you include one, confirm its adjustment range and whether it can be removed when the target customer prefers a cleaner business style. Reinforcement at the shoulder strap roots and carry handle also belongs in the development specification, with strength checks matched to the expected load.
Which Fabrics, Linings, and Zippers Should You Choose?
Choose materials as an assembly. The outer fabric, coating, lining, foam, and closures need to work together without creating unnecessary bulk or making the sample difficult to sew and operate.
Polyester and nylon are both possible shell materials, but the fiber name alone does not determine performance. Record the weave, fabric weight, yarn specification, coating, finish, and approved material reference. Compare actual samples for abrasion, tear behavior, color transfer, appearance, and handling as relevant to your product.
| Composant | Specify before approval | Tradeoff to assess |
|---|---|---|
| Tissu extérieur | Composition, construction, weight, coating, and color | Structure and wear performance versus weight and flexibility |
| Doublure | Composition, weight, color, and surface finish | Visibility and device contact versus snagging and seam bulk |
| Mousse | Type, density, thickness, and coverage | Cushioning behavior versus bulk and stiffness |
| Fermetures à glissière | Supplier, product reference, size, slider, and puller | Ease of access versus closure size and weather protection |
| Webbing and buckles | Dimensions, material, finish, and compatibility | Adjustment feel and retention under the intended load |
Test the zippers on the completed bag, especially around corners and near thick padded sections. A zipper that works smoothly as a loose component may drag after installation or under pressure from an overfilled compartment. Confirm that lining, thread, and binding stay clear of the slider path.
Weather protection needs precise wording. YKK explains the difference between water-resistant and waterproof zippers, including the water-repellent treatment used on AquaGuard products. A water-resistant closure does not establish that the complete backpack is waterproof; seams and openings also need assessment.
For material claims, check the documentation scope before approving labels. NORME OEKO-TEX 100 addresses textiles tested for harmful substances; a component certificate should not be presented as certification of an entire backpack. Where recycled content is part of the brief, review Textile Exchange’s RCS and GRS information and the supporting supply-chain documentation for the proposed claim.
Ask your compliance contact or laboratory to define the applicable destination-market and retailer requirements before materials are ordered. European and North American brands may use different specifications, so a general statement that a fabric is “export quality” does not replace your approved test and documentation requirements.
Which Extra Features Are Worth Adding to Your Design?
Choose custom laptop backpack features around the customer’s routine. Each addition takes up space, adds weight, or introduces development work, so decide what it helps the wearer do before including it.
A luggage pass-through can be valuable for business travel. Test it on the intended trolley handles with the backpack loaded, checking stability and clearance. A bottle pocket is often useful for daily use, but its size and retention must match the bottle you expect customers to carry.
A concealed pocket, removable accessory pouch, or key tether may improve organization. Check access while wearing or handling the bag, and make sure the feature does not create a hard contact point or block another compartment. Visibility details may suit commuting products, but a reflective trim alone should not be described as a certified safety feature.
Treat charging ports, integrated locks, and expansion systems as separate development decisions. A cable pass-through does not provide power by itself, and any included electrical equipment brings additional specifications and market checks. An expansion zipper can change the bag’s balance and usable shape, so test both configurations.
Set three priorities: essential features, optional features to evaluate, and features to omit. Freeze the approved list before production and confirm any effect on material sourcing, color assortment, or minimum quantities. For a smaller first order, separate essential laptop protection from optional extras before asking the supplier to quote alternatives. HeteBag’s guide to custom laptop backpack MOQ explains how material and component commitments affect the quantities you can order.
What Should You Check in a Sample Before Production?
Test the bag as customers will use it
Evaluate the sample with the target laptop and complete packing list. Insert and remove the device, reach the quick-access pockets, use the bottle pocket, carry the bag, and operate the closures while loaded. Record problems with photos, dimensions, and a description of the conditions that caused them.
Check both left and right sides for symmetry, inspect strap and handle attachments, and look for exposed hard parts inside the laptop compartment. Review empty weight, overall dimensions, usable sleeve dimensions, pocket depth, padding coverage, and the agreed tolerances. Check appearance again after the bag has been packed and unpacked using the proposed shipping method.
Turn approval into a controlled specification
Agree on product-specific test methods and acceptance criteria for the functions your brand promises. Depending on the design, these may include loaded carry checks, strap and handle strength, zipper cycling, seam strength, abrasion, color transfer, or water resistance. State the load, conditions, and repetitions instead of simply requesting a “durability test.”
The approved pre-production sample should reflect the intended bulk materials, components, artwork, labels, and construction. Identify any temporary substitutes explicitly and resolve them before release. Keep a signed reference sample and a dated specification revision so both teams know what has been approved.
Photographs help communication, but they cannot confirm padding behavior, usable pocket volume, or carry comfort. If you are still evaluating suppliers, use the checks in how to choose a custom laptop backpack manufacturer to assess sampling and production control alongside the design itself.
Conclusion
A successful custom laptop backpack design fits the intended device and stays easy to use with the daily load inside. Approve access and carry comfort alongside the appearance, and agree on how any performance claims will be verified.
Before production, settle the usable dimensions, compartment layout, padding assembly, materials, and sample acceptance criteria. To discuss an OEM laptop backpack project with HeteBag, share your target market, laptop dimensions, carrying list, reference images, quantities, and required features through the website’s project inquiry form. Those details give the development discussion a useful starting point.
Questions fréquemment posées
Can one backpack fit both 14-inch and 16-inch laptops?
It can, if the compartment accommodates the largest target device and controls the smaller one adequately. Test the actual external dimensions of both devices, including any intended protective cases, and check retention as well as insertion.
How much padding should a laptop backpack have?
There is no single thickness suitable for every construction. Specify foam type, density, thickness, coverage, and base support, then evaluate the assembled sample against an agreed protection target.
Is a suspended laptop sleeve enough to protect the device?
A suspended sleeve provides clearance above the bag’s base, but its benefit depends on the loaded construction. Check for sagging, side and corner protection, hard contact points, and performance under defined evaluation conditions.
Should the laptop compartment have a separate zipper?
A separate opening can make device access easier when the main compartment is full. It also adds construction and components, so compare the access benefit with your product’s weight, layout, and intended customer routine.
Can features be changed after the first sample?
Yes, but changes to pockets, padding, openings, or straps may affect several neighboring parts. Document each revision and recheck the affected functions; approve a sample representing the final specification before bulk production.


